
Views: 0 Author: Site Editor Publish Time: 2025-09-11 Origin: Site
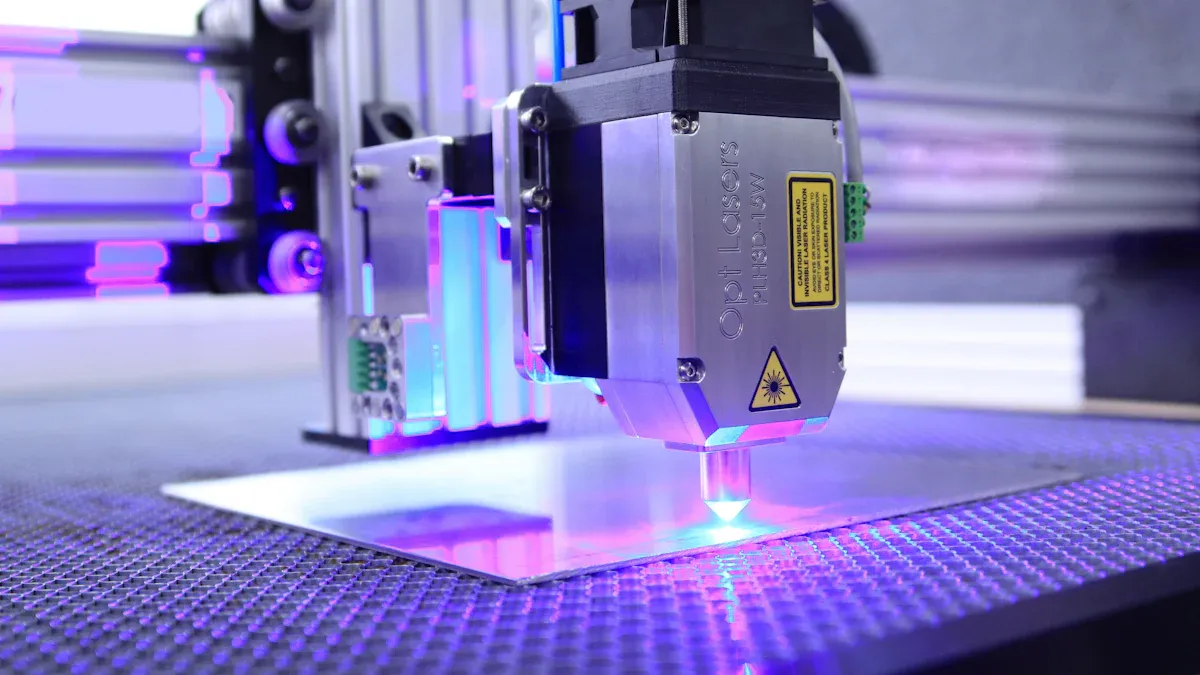
When you use acrylic cnc machining, you must pick the right tools and methods. The TAIZ CNC Machining Center lets you control the process very well. This helps you get good results with cnc machining acrylic. Many people have problems like melting, chipping, or a cloudy look.
Picking the right cutting tool stops melting and chipping.
Tools with sharp, smooth tips help stop cracks.
Controlling heat keeps acrylic from melting or changing shape.
Acrylic machining is useful in many fields, like cars, planes, and medicine. You can see why cnc machining is good when you need clear, exact, and strong acrylic parts. If you ask why to use cnc machining, remember that new machines help you get better quality and work faster.
Pick sharp cutting tools so the acrylic does not melt or chip.
Control heat by using the right spindle speed and feed rate. This helps keep the acrylic parts good.
Use cooling like compressed air or mist to keep acrylic cool. This stops the acrylic from getting cloudy.
Do milling in two steps. First, do a rough pass. Then, finish to make the surface clear.
Choose the best polishing way to make your acrylic parts look clear and smooth.
PMMA is a type of acrylic used in cnc plastic machining. It is hard, especially when it is cold. This hardness helps you make smooth cuts. PMMA gets stiffer as the temperature drops. This means you can get better surfaces when machining.
PMMA can be both hard and flexible. Its behavior changes with temperature. For example:
PMMA gets harder in cold temperatures, so it is easier to machine.
The stiffness, called Young's modulus, also increases when it is cold.
PMMA can stretch and relax in different ways as it gets warmer or cooler.
PMMA expands a lot when it gets hot. This means it can change shape during cnc plastic machining. It does not move heat well, so heat can build up fast. If PMMA gets too hot, it will start to lose its shape. The softening temperature tells you when this happens.
How PMMA acts during cnc plastic machining depends on its molecules. PMMA has long chains with few crosslinks. This makes it easier to scratch or wear down when cutting. You might see both ductile and brittle breaks, so you need to choose the right settings.
Acrylic resists wear like aluminum. This helps your tools last longer. If you use a slow feed rate, chips can stick to the surface. This makes the finish look bad. Acrylic melts at a lower temperature than glass, so you must watch the heat.
To get good results, use a sharp cutting tool and coolant. This lowers friction and keeps the surface smooth. Use slower speeds and faster feed rates to stop melting. A cutting tool with a 5-degree rake angle and a 2-degree clearance angle works well for cnc plastic machining. These tips help you avoid problems and get a clear finish.
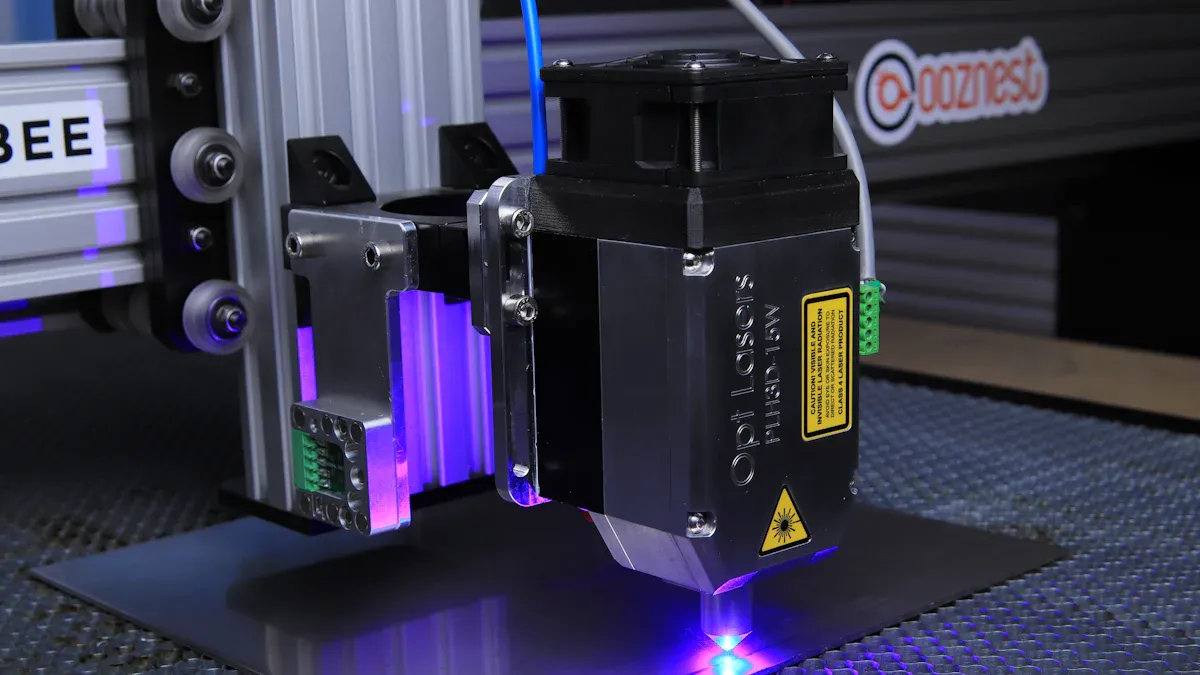
When you want to machine acrylic, you need the right equipment and methods. The TAIZ CNC Machining Center gives you advanced control and precision for all cnc acrylic processes. You can use this machine to create clear, strong, and accurate acrylic parts for many industries. Let’s look at the main cnc machining methods you can use for acrylic machining.
Milling is one of the most common cnc acrylic processes. You use a rotating tool to remove material and shape the acrylic. The TAIZ CNC Machining Center supports high-speed milling, which helps you get a smooth and clear finish.
Tip: For the best results in cnc milling acrylic, use tools with high positive or high shear cutting geometry. Start with a roughing pass, then follow with a finishing pass. This two-step process helps you achieve a clear surface.
Use a DATRON double flute end mill with polished flutes for extra transparency.
Try a roughing pass with a 5mm single-flute end mill at 15,000 RPM.
Use a finishing pass with a 3mm double-flute ball nose end mill at 40,000 RPM.
Choose a high-quality router bit with upward spiral, single flute geometry.
Split the process into roughing and finishing cuts to protect your finishing tool.
Pick the shortest flute length possible to reduce cutter deflection and chatter.
You should also set the spindle speed between 18,000 and 20,000 RPM. Keep the feed rate between 100 and 300 inches per minute. Sharp, single-flute carbide tools help remove chips and reduce friction. These steps help you avoid melting and get a clear finish when you cnc machine acrylic parts.
Turning is another important cnc acrylic process. You use a lathe to spin the acrylic while a cutting tool shapes it. The TAIZ CNC Machining Center can handle turning operations with high accuracy.
You should use sharp tools with a positive rake angle. This helps you avoid chipping and keeps the surface smooth. Set the spindle speed high, but not so high that the acrylic heats up and melts. Use a steady feed rate to keep the chips moving away from the part. If you want a clear finish, make a light finishing pass at the end.
Engraving lets you add text, logos, or patterns to acrylic parts. The TAIZ CNC Machining Center gives you the control you need for detailed engraving.
Tool Geometry | Effect on Quality |
|---|---|
Upward Spiral, Single Flute | Achieves a smooth and consistent finish |
60° Engraving Bit | Enhances edge quality compared to other bits |
O-Flute Bits | Produces polished edges with minimal chatter |
Proper tool selection and geometry help you get the best results. Single-flute upcut bits clear chips quickly and keep the acrylic cool. This reduces the risk of melting or chipping. You can use a 60° engraving bit for sharp, clean lines. O-flute bits give you polished edges with less noise and vibration.
Drilling is a key step in many cnc acrylic processes. You need to prevent cracks and keep the holes clear. The TAIZ CNC Machining Center supports precise drilling with adjustable speeds and feeds.
Use single or double flute upcut bits made for acrylic.
Set the spindle speed high (18,000+ RPM) and use a slower feed rate.
Never drill deeper than one-third of the bit diameter in a single pass.
Use compressed air to clear chips during cutting.
Parameter | Roughing Operations | Finishing Operations |
|---|---|---|
Spindle Speed | 10,000-15,000 RPM | 16,000-24,000 RPM |
Feed Rate | 60-100 inches/min | 40-60 inches/min |
Step-Over | 50% of tool diameter | 10-15% of tool diameter |
Depth of Cut | Up to 0.125" | 0.010"-0.030" |
You can also use compressed air cooling or minimal quantity lubrication to keep the acrylic cool and prevent cracks.
Cutting is the final step in many cnc acrylic processes. You want smooth, clear edges on your cnc machining acrylic parts. The TAIZ CNC Machining Center gives you the power and control to cut acrylic with high precision.
Monitor the cutting depth and direction. Know how the tool rotates for accurate cuts.
Set the right feed rate. Too fast can break the acrylic, too slow can make rough surfaces.
Use sharp, strong cutters. Avoid bits that have been used for metal.
Choose carbide bits and use a ramping technique to prevent damage.
Start with a spindle speed of 18,000 RPM and adjust as needed to avoid melting.
Aim for a cut depth about twice the bit diameter for even results.
You can use these cnc machining methods to cut acrylic for many uses, such as signs, displays, and medical devices. The TAIZ CNC Machining Center helps you get the best results in every step of acrylic machining.
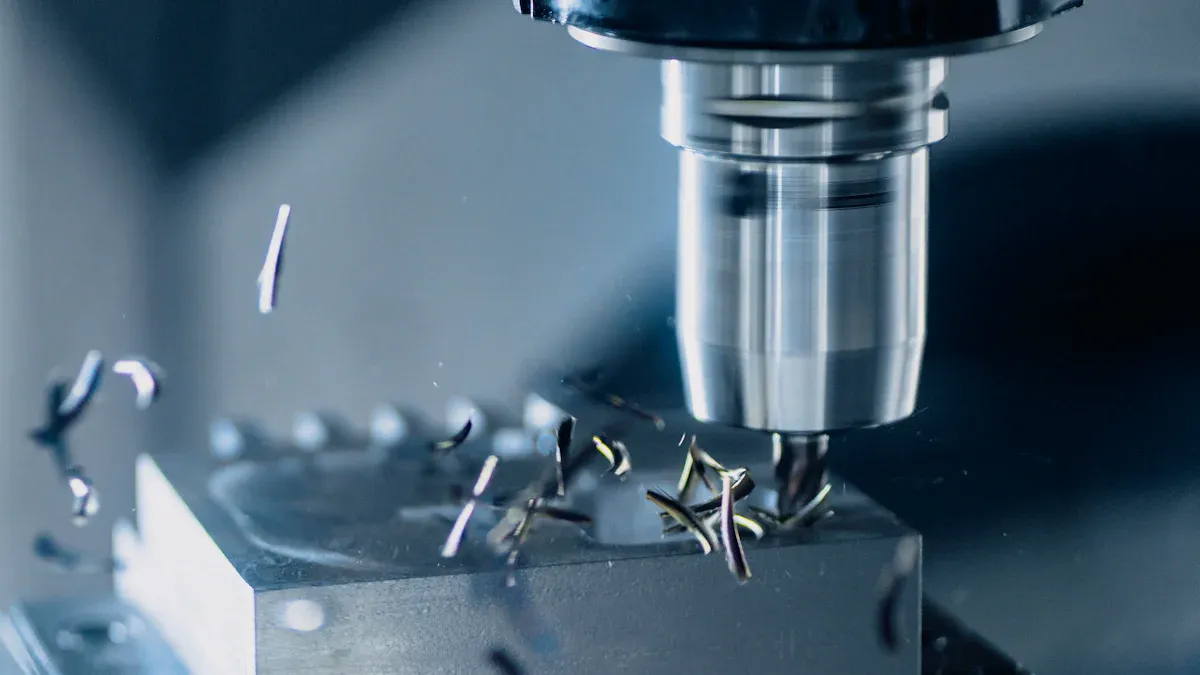
To get good results with acrylic machining, you need the right tools and settings. The TAIZ CNC Machining Center has special features. It has a high-speed spindle. It can move very precisely. You can pick different controller options. These features help you make cnc acrylic parts that look clear and are very accurate. Here are the most important things for successful acrylic cnc machining.
Choosing the correct cutting tool is very important. Use sharp carbide tools with one or two flutes. These tools take away chips fast. They also lower friction. This helps stop melting and chipping when you cut acrylic. The TAIZ CNC Machining Center works with many tool types. You can pick the best tool for your job.
You should also think about tool coatings. The right coating helps your tool last longer. It also makes your parts look better. Here is a table that shows some common tool coatings and what they do:
Tool Coating | Benefits |
|---|---|
TiN | Lowers friction, stops sticking, handles high heat, makes tools last longer |
TiAlN | Cuts better, stays hard at high heat, lowers heat |
DLC | Very hard, smooth, low friction, makes fine finishes, does not react with chemicals |
If you use tools with these coatings, your tools last longer. Your parts will look better too. The TAIZ CNC Machining Center lets you change tools easily. You can always use the best tool for each step.
Tip: Always use a new or sharp tool for acrylic machining. Dull tools can make cracks, rough edges, or melting.
Setting the right spindle speed and feed rate is very important for cnc machining acrylic. If the spindle goes too fast or too slow, heat can build up. This can make the surface look bad. The TAIZ CNC Machining Center has a high-speed spindle. You can change the speed for different jobs.
Here is a table with good ranges for spindle speed and feed rate when you use a cnc milling machine or cnc cutting machines for acrylic:
Parameter | Range |
|---|---|
Spindle Speed | 10,000-16,000 RPM |
Feed Rate | 0.002-0.004 inches per tooth (IPT) |
Start with these settings. Change them based on your tool size and how thick the acrylic is. Higher spindle speed can make a smoother finish. But you need to watch for heat. Lower feed rate can stop chipping. But if it is too slow, it can cause melting.
Note: The TAIZ CNC Machining Center’s controller options, like Siemens or Fanuc, let you set exact speeds and feeds for every job. This helps you get the best results with every cut.
Cooling and lubrication are very important in acrylic machining. Cutting acrylic can make a lot of heat. This can cause melting, warping, or cloudy parts. The TAIZ CNC Machining Center can use different cooling and lubrication systems. These help you control heat and keep your parts clear.
Here are some ways cooling and lubrication help during cnc machining:
Cooling systems control heat and stop damage. This keeps your parts clear and accurate.
Lubrication lowers friction and wear. Your tools last longer and work better.
Air or coolant takes chips away from the cutting area. This stops chips from scratching or clogging the tool.
A little lubricant can stop chips from sticking and help the process.
Some coolants protect your tools from rust.
Cooling and lubrication help you get a smooth, clear finish on your acrylic parts.
You can use compressed air, mist coolant, or minimal quantity lubrication (MQL) with a cnc milling machine or cnc cutting machines. The TAIZ CNC Machining Center makes it easy to add these systems.
Tip: Always keep the cutting area clean and cool. This helps you stop melting and get the best finish on your acrylic parts.
When you use the right tools, settings, and cooling methods, you can do acrylic cnc machining very well. The TAIZ CNC Machining Center gives you control and flexibility. You can make high-quality cnc acrylic parts for any industry.
Heat is a big problem when you machine acrylic. Too much heat can melt the material. This can ruin your part. You need to control your tools and cooling. Here is a table that shows ways to stop melting acrylic during acrylic cnc machining:
Method | Explanation |
|---|---|
Use larger bit | Bigger tools take away more debris and lower friction. This helps stop melting acrylic. |
Set higher feed rate | Moving the tool faster keeps heat from building up. |
Cooling acrylic | Cooling before or during cutting, like using cold mist, keeps the material from melting. |
You can use air blast or mist cooling too. These keep the tool and acrylic cool. They stop heat from building up at the tool tip. This helps prevent clouding or melting. The TAIZ CNC Machining Center has air blast and mist cooling systems. These make it easier to keep your workpiece cool and clear.
Chipping happens a lot in acrylic machining. You want smooth, clean edges on every part. To stop chipping, always use sharp, good tools made for acrylic. Dull tools make more friction and can cause cracks or rough edges. Keep spindle speed between 18,000 and 24,000 RPM. Use a feed rate of 0.02 to 0.1 inches per tooth. Cooling with air or mist also helps stop chipping and keeps the surface smooth.
Use sharp cutting tools to lower heat and pressure.
Change dull bits right away to avoid cracks.
Keep the material cool with air or coolant.
Pick a new HSS bit for best results.
The TAIZ CNC Machining Center lets you control speed and tool changes. You can always use the best setup for your job.
A good surface finish makes acrylic parts look clear and nice. After acrylic cnc machining, you can use different ways to make the surface better. Flame polishing uses a quick pass of a hot flame to make edges shiny. Mechanical polishing or buffing uses fine abrasives for bigger surfaces. Vapor polishing gives very high clarity. Sanding makes a frosted look. You can also paint your parts for custom colors.
Tip: The TAIZ CNC Machining Center’s accuracy and support help you get the best finish. If you need help, their team can guide you on the right polishing method for your project.
If you follow these tips, you can stop melting acrylic, reduce chipping, and get a smooth finish every time you use acrylic machining.
There are different ways to polish acrylic parts. Each way gives a special look and feel. Some methods work better for certain jobs. Here is a table that shows common polishing methods:
Polishing Method | Description | Ideal Use Case |
|---|---|---|
Sanding | Takes away rough spots and smooths the surface with different grit levels. | Getting special textures and finishes. |
Chemical Polishing | Puts parts in a chemical bath to melt and smooth the surface. | Thin or delicate parts where sanding is hard. |
Bead Blasting | Shoots tiny beads fast to make a soft, even matte finish. | Hiding small flaws and getting ready for paint. |
Start with sanding to get rid of scratches or marks. Use smaller grit sandpaper for a smoother finish. Chemical polishing is good for thin or weak parts. Bead blasting makes the surface look soft and hides little mistakes.
Tip: Clean your acrylic parts before you polish them. Dust or chips can scratch the surface while you finish it.
Flame polishing makes acrylic edges shiny and clear. You move a hot flame over the edge. The heat melts the top and smooths out tiny marks. This helps the polymer chains line up better. It makes the part clearer and stops light from bending wrong. You get a bright, glass-like edge that looks nice.
Take off any protective film before you use flame polishing. For the best results, heat the part after polishing. This step lowers stress and helps stop cracks later.
Edge finishing makes acrylic parts look better and safer. You can use different ways to match your project. Here is a table with common edge finishes and how to do them:
Finish Type | Method |
|---|---|
High Luster | Polishing |
Satin | Sanding |
Matte | Scraping (Edges only) |
Medium-High Luster | Flame Polishing (Edges only) |
Matte to Medium Luster | Edge Finishing Machines |
For a fancy edge, mill it first. Then sand with four types of wet-dry sandpaper. Buff it with a rough polish and then a fine polish. Flame polishing works well for tables and displays. Scraping gives a soft, dull edge. Edge finishing machines help you make many parts look the same.
Use these finishing steps to make your acrylic projects look neat and professional.
Acrylic machining parts are used in many areas. The TAIZ CNC Machining Center helps you make clear and strong parts. You can create pieces for different jobs. These machines help with optical prototyping, signs, industrial work, and medical devices.
CNC acrylic machining makes many optical parts. These parts help test and build new products. Some examples are:
Lenses for cameras and tools
Optical windows for sensors and screens
Open camera glass for testing
You get smooth surfaces and clear finishes. This lets you see how light moves in your designs.
Acrylic machining helps you make bright signs and displays. The TAIZ CNC Machining Center can cut, engrave, and shape acrylic. Here is a table with common uses:
Application Type | Description |
|---|---|
Dimensional logos and letters | Cut or engrave acrylic sheets to make sign letters and logos with depth. |
Illuminated and backlit signs | Acrylic’s clarity is good for edge-lit and backlit signs. Light shines through well. |
Display cases and stands | Build brochure holders and museum displays. Show off design flexibility. |
POP/trade show exhibits | Acrylic displays are strong and easy to move. They work well for trade show setups. |
You can make signs that stand out. Displays protect and show products.
CNC acrylic machining makes many industrial parts. These parts are used in stores, offices, and defense. You can make:
Custom guards, shields, and covers for machines
Precision parts for different industries
You get strong and reliable acrylic parts that fit your needs.
CNC acrylic machining is used for medical devices. This process has many benefits:
Versatility: Make many types of parts for medical use.
Speed: Get quick results from design to finished part.
Cost-effectiveness: No special tools needed, so you save time and money.
No volume limits: Make one part or many, good for custom devices.
Tight tolerances: Get precise parts that meet safety rules.
You can make custom guards, shields, and covers for medical equipment. The TAIZ CNC Machining Center helps you meet strict medical standards.
CNC acrylic parts are used in many fields. The TAIZ CNC Machining Center gives you the tools to do well in each area.
You now know the key steps for acrylic cnc machining. Use sharp tools, set the right speeds, and keep your work cool for the best machined acrylic. The TAIZ CNC Machining Center helps you make high-quality acrylic parts with precision and speed.
You can create complex shapes and meet strict design needs.
You get reliable results and clear finishes every time.
Many customers trust TAIZ for their acrylic machining needs because of proven expertise and advanced equipment.
Try these tips in your projects. If you want custom solutions or more help, reach out to TAIZ for support.
You should use a sharp, single-flute carbide bit. This tool removes chips quickly and keeps the acrylic cool. It helps you get a smooth, clear edge without melting or chipping.
Set a high feed rate and use cooling, like compressed air or mist. Keep your tools sharp. These steps help you move heat away fast and prevent the acrylic from melting.
You can use water in small amounts, but avoid soaking the acrylic. Too much water can cause stress cracks. Use compressed air or a light mist for safer cooling.
Cloudiness often comes from heat or dull tools. Try using a sharper bit, higher feed rate, and cooling. You can also polish the surface after machining to restore clarity.
Many industries use acrylic parts. You see them in automotive, aerospace, medical, and electronics. Acrylic works well for signs, displays, lenses, and protective covers.


